Friday, April 30, 2010

Fabulous Friday

So the Barium Swallow was a traumatic experience for both me and my little man. He was terrified of the technicians and the XRay machine and my heart was breaking because he was crying so much. But at least it is over with and now we wait for the results.......

The card I posted today looks nothing like what I had intended it to look like. The oval shape was made with Oval Scallop Frame die. I had orginally planned to use the scalloped part of the die with DSP but no matter what I did I couldn't get it to look right. My taffeta ribbon was on my desk and I was like "Hmmm...What would it look like if...." and that's how I lost the frame and gained the ruffle. To make the ruffle all I did was apply sticky strip to the back of the oval, all the way around, and then just kept folding and sticking the ribbon. I then stuck it to the card with 2 layers dimensionals (2 stuck together) so that the ribbon didn't get too squished. I did the sparkle around the circle with the "bliss" stamp on it by running my 2-way glue pen around the edge then dipping it into my Dazzling Diamonds. And LOOK more HodgePodge. I think I am on the path to recovery. LMBO

Supplies
Stamps: For the Bride
Paper: Not Quite Navy, Very Vanilla, Bella Bleu DSP
Ink: Basic Black, Not Quite Navy Ink Pad and Marker
Accessories: Very Vanilla Taffeta Ribbon, Styled Vanilla HodgePodge Hardware, 3/4" Circle Punch, 1" Circle Punch, Oval Scallop Frame Die, Big Shot, Dazzling Diamonds, Stampin' Sponges, Stampin' Dimensionals, 2-way Glue Pen, Snail Adhesive, Sticky Strip

Thursday, April 29, 2010

Try It Thursday

Today is going to be a rough day. I have to take my 21 month old little boy for a Barium Swallow. He has had Acid Reflux since he was born and we have to do the XRay series to see if everything is OK. It is really nerve racking. I know there's going to be a lot of crying because he doesn't like it when you hold him still and he is a really shy little boy.

This card is one I made for my God-Son. He is turning 14 and I find this is the hardest age to make a card for. Especially a boy. You can't use ribbons or flowers and most of the patterned papers are girly. So Stampin' Up! if you are reading this (yay right. Although I would be floored if Shelli Gardner sat down and said "Gee, maybe I will check out Michelle Singer's Blog today!") we would like more masculine DSP please!!! Maybe an email would work better. Anyhoo!

For Try It Thursday, I thought we could try collage stamping. That's where you stamp lots of different layers of images ranging from light to dark. I haven't read any official info on this technique but I can tell you how I do it. I usually start with my lightest color and I stamp the most with this ink. I then layer from lightest to darkest with my main focus image being the darkest. For example, in the card above, I stamped the blob image from the Extreme Elements set in Sahara Sand. I stamped the dots in Going Gray. I stamped the stars in Basic Gray and the Guitar dude and Happy Birthday in Night of Navy (in that order). This technique looks really awesome with floral images, too! Try it with Inspired by Nature or Pocket Silhouettes.

Supplies
Stamps: Extreme Elements, Extreme Guitar, On Your Birthday
Paper: Bashful Blue, Whisper White, Pawsitively Prints DSP
Ink: Sahara Sand, Going Gray, Basic Gray, Night of Navy
Accessories: Linen Thread, Fresh Favorites Buttons, Stampin' Sponge, Stampin' Dimensionals, Mini Glue Dots, Snail Adhesive

Tuesday, April 27, 2010

Wheel It Wednesday

OK, so I was getting ready to go to bed (I schedule my blog posts the night before) and realized that I absolutely forgot about posting on my blog today. I didn't even have a card made. A normal person would just go to bed and work at it tomorrow. Not me though. I'm the foolish one that races to my craft room as my husband shakes his head at me.
What does a 5 minute card look like? Ta-Da!!! Here you have it. I just rolled my wheel in Close to Cocoa ink, use a tissue to rub the ink off the word Love and Heart image and colored it with my Not Quite Navy marker. I hope it isn't to disappointing. See ya later today when I post the winner of yesterdays card kit..

ETA: The winner of yesterday's card Kit from Random.org is.....drumroll.....Number 22

This is really a gorgeous card. You CASED it like a champ! :) LOL
I would really love to win and make some of them myself!
Have a great day,
Wendy Hawkinson
www.gotrubberwillstamp.blogspot.com

I will email you for your contact info so I can send you your card kit.


Supplies
Stamps: I {Heart} Hearts, I {Love} Love Wheel, Texture Wheel
Paper: Close to Cocoa, Not Quite Navy, Kraft, Whisper White
Ink: Close to Cocoa, Not Quite Navy Marker
Accessories: Mini Vintage tags, Hemp Twine, Jumbo Wheel Handle, Piercing tool, Jewelry Tag Punch, Small Heart Punch, Cutter Kit, Snail Adhesive

Take It Tuesday

I love joining card swaps. The cards I get back are always so beautiful and I always get tons of great ideas to try out myself. But.... I always get swappers block when it comes time to design my swap card. I make all different kinds and I either end up not liking it, thinking it is not good enough or the card is just way too complicated to make 30 of them.
The card above is my swap card that I finally decided on for an upcoming Stampin' Up! Summer Mini Swap. But, here is the deal. This card is a case of a case. I cased a card a little while ago for a friend's birthday. I had no intention of publishing it so I didn't keep any of the info on who I cased. I cased the birthday card I made to make this swap card. So..... If you looked at this post and say to yourself "Hey, that looks an awful lot like my card" I want to give you credit for such an awesome layout. Pop me an email and I'll add your name to this post.

This card is part of Take It Tuesday. If you leave a comment on this blog post (click here if you are on Facebook), you will be entered to win a free card kit with enough supplies to make 5 copies of this card (minus the adhesive and stamped images). You have until midnight April 27/10. I will pick a winner on Wednesday.

Supplies
Stamps: Elements of Style
Paper: Very Vanilla, Soft Suede, Kraft, Bella Bleu DSP
Ink: Soft Suede, Riding Hood Red, Always Artichoke
Accessories: Kraft Taffeta Ribbon, Blender Pen, Stampin' Sponges, Blender Pen, Scallop Oval Punch, Large Oval Punch, Eyelet Border Punch, Snail Adhesive, Stampin' Dimensionals

Monday, April 26, 2010

Make It Monday


This week is going to be so busy for me. I hope I get a chance to post on my blog daily. But I don't know.

This week's Make it Monday is coloring outside the lines. The technique is really awesome the add shadow and to make white images pop.

See below for a tutorial on how to make this card.

Supplies
Stamps: Fifth Avenue Floral
Paper: Baja Breeze, Soft Suede, Whisper White, Baja Breeze Prints DSP
Ink: Black Stazon, Baja Breeze
Accessories: Flower Designer Brads, White Satin White colored with Baja Breeze ink (OMG I hope they have this color in the new caddy), Piercing tool, Stampin' Sponge, Stampin' Dimensionals, Snail Adhesive, Blender Pen

Coloring Outside the Lines

Friday, April 23, 2010

Fabulous Friday

It's Fabulous Friday. I think the Late Night Stampers challenge this week is to make a Mother's Day Card. So I guess this would make a good entry. If it's not Mother's Day than oopie, my bad.
I started this card just wanting to use Blush Blossom and Basic Black together and this is what the end result ended up being.
Some deets: I made the Basic Black background by stamping the Bella Toile BG stamp in Versamark and embossing with clear embossing powder and then spritzing with the new Vanilla Shimmer Smooth Spritz ( from the summer mini available May 1). When it dried, which was less than a minute (this stuff dries really fast), I used a tissue to wipe the spritz off of the embossed area. The Blush Blossom satin ribbon is the White satin ribbon that I colored with my Blush Blossom marker. To put the Jumbo grommet on the ribbon I just used my bone folder to bend down tabs and used Tombow adhesive to glue it on. I also used the Tombow to glue on the halfback pearls. Lastly, I sponged the Whisper White pieces with Basic Black ink.

Supplies
Stamps: Awash in Flowers, Teeny Tiny Wishes, Bella Toile Background Stamp
Paper: Basic Black, Blush Blossom, Whisper White
Ink: Basic Black, Blush Blossom, Certainly Celery, Versamark
Accessories: Pretties Kit, Black Satin Ribbon, White Satin Ribbon colored with Blush Blossom marker, Clear Rhinestone Brads, Embossing Powder, Word Window Punch, Modern Label Punch, Mat Pack, Piercing tool, Vanilla Shimmer Smooch Spritz, Snail Adhesive, Tombow Adhesive, Stampin' Dimensionals, Stampin' Sponges

Thursday, April 22, 2010

Try It Thursday

Look, more HodgePodge. Two pieces at that. I can hear my inner voice screaming "Michelle, what are you doing?" From the comments I got yesterday it looks like I'm on the path to recovery. Admitting I have a hoarding problem is the first step. LOL

You might ask why I made two of the same card. Well, the reason is because this vintagy, ripped, distressed, crumpled, dirty look is a little bit out of my comfort zone. I made the card on the right first, and thought OMG this is too much. So I made the card on the left which is more in my usual comfort zone. It was a good learning experience for me because I think I like the card on the right better which is way more distressed. What do you think?

Card #1?

Or card #2?
So for Try It Thursday, why don't you distress something. Crumpled some paper, tear some edges, run your scissors along some edges, get out your sanding blocks and stampin' sponges and get your hands all dirty.

P.S. You know I'm going to swap out the ribbon slide for something else on one of the cards. I know, I'm terrible.

Supplies
Stamps: Elements of Style (again, I know)
Paper: Pale Plum, Close to Cocoa, Confetti Cream, Cottage Wall DSP
Ink: Basic Brown (for stamping), Creamy Caramel (for distressing)
Accessories: Styled Vanilla HodgePodge Hardware, Chocolate Chip 1 1/4" Striped Grosgrain Ribbon, Large Oval Punch, Scalloped Oval Punch, Mat Pack, Paper Piercing Tool, Cutter Kit, Stampin' Sponge, Stampin' Dimensionals, Snail Adhesive

Wednesday, April 21, 2010

Wheel It Wednesday


Ok. So I opened up my HodgePodge Hardware case to make this card and I swear it squeaked. I really need to use these embellies more often. I bought the Styled Vanilla kit when it first came out and I only had one piece gone out of it and that was because a friend of mine was in a swap and needed one ribbon slide, so I gave it to her. I think I need a 12 step program to get over my fear of Hodgepodge usage. Seriously, HodgePodge Hoarders Anonymous here I come. When I was making this card, I had to keep reminding myself that I can take the HodgePodge off if I'm not happy with the card. But in the end I like how it turned out.

ETA: The winner of yesterday's card Kit from Random.org is.....drumroll.....

A very nice card.Thanks for sharing.

allexgirl said... April 20, 2010 7:46 PM

Please email me at stampinwithmichelle@shaw.ca with your contact info so I can send you your card kit.


The wheel I used on this card was to create a background. It is the Texture Wheel and I think it gives a nice vintagy look. I even wheeled on the patterned paper. The image was stamped in Very Vanilla cardstock and colored using a blender pen and ink from the lid of my ink pad after I squished it. All the paper edges were sponged with Soft Suede Ink.

Supplies
Stamps: Elements of Style (from the Summer Mini starting May 1 and OMG do I ever love this stampset), Texture Wheel
Paper: Very Vanilla, Kraft, Soft Suede, Autumn Traditions DSP
Ink: Soft Suede, Always Artichoke, Riding Hood Red
Accessories: Styled Vanilla HodgePodge Hardware, Kraft Taffeta Ribbon, Blender Pen, Scallop Border Punch, Piercing Tool, Snail Adhesive, Stampin' Dimensionals, Stampin' Sponges

CLICK HERE TO ORDER PRODUCTS 24/7

Tuesday, April 20, 2010

Take It Tuesday

I made this card in the company of a eight legged creature from hell. I have fluorescent lighting in my craft room and the little bugger keep running around on the plastic that covers the light. And of coarse, it had to be right above my work space. So what do I do? Move to far end of my desk and work in a little 1 foot square area looking up about every 1.5 seconds to see where the spider was and what it was doing. Cause you never know when it could find a seam to crawl through and fall from the ceiling. Ahhh... the inner workings of the arachnophobic mind.

The flower image was stamped off twice before I stamped it on Whisper White to lighten up the color.

This card is part of Take It Tuesday. If you leave a comment on this blog post (click here if you are on Facebook), you will be entered to win a free card kit with enough supplies to make 5 copies of this card (minus the adhesive and stamped images). You have until midnight April 20/10. I will pick a winner on Wednesday.

Supplies
Stamps:On Your Birthday, Friends 24-7, En Francais Background Stamp
Paper: Whisper White, Basic Black, Rich Razzleberry
Ink:Basic lack, Rich Razzleberry
Accessories: Basic Black 5/8" Grosgrain Ribbon, Black Vintage Brads, Corner Rounder Punch, Snail Adhesive, Stampin' Dimensionals

Monday, April 19, 2010

Make It Monday

This card is a case from page 88 of the idea book and catalogue. I didn't have the textured Chocolate Chip cardstock so I used my Big Shot and wood grain Texturz plate instead. I have a lot of ironing to do before bedtime so I have to cut my post short. See Below for a tutorial.

Supplies
Stamps: Bugs & Kisses
Paper: Brilliant Blue, Rose Red, Chocolate Chip, Whisper White, Tall Tales DSP
Ink: Markers - Brilliant Blue, Old Olive, Rose Red, So Saffron
Accessories: Old Olive 5/8" Grosgrain Ribbon, Earth Elements Brads, Big Shot, Impressions Pad, Silicone Pad, Backgrounds I Texturz Plates, Kit #4 Texturz Plates, Mat Pack, Piercing tool, Snail Adhesive, Stampin' Dimensionals

Bugs & Kisses Card

Friday, April 16, 2010

Fabulous Friday

It's Fabulous Friday and what is so fabulous about this card you might ask. Well, it would be the amount of brads I used. 19 brads on one card is a new record for me. I'm usually pretty stingy with the hardware. Don't even get me going on the Hodgepodge Hardware. The only bad thing was separating all the prongs on the back of the brads. Man, my fingers hurt.

Supplies
Stamps: Lots of Bots
Paper: Taken with Teal, Close to Cocoa, Whisper White, Sweet Pea DSP
Ink: Basic Black Marker, Taken with Teal Marker, Dusty Durango Marker, So Saffron Marker, Basic Gray Marker
Accessories: Silver Brads, Dusty Durango Polka Dot Ribbon, Blender pen for making shadow on the ground, Piercing Tool, Mat Pack, Word Window Punch, Modern Label Punch, Photo Corner Punch, Circle Scissors Plus, Stampin' Dimensionals, Snail Adhesive

Thursday, April 15, 2010

Try It Thursday

For Try It Thursday, I thought it might be fun to try masking. On this card, I took a piece of printer paper and cut it to 3 3/8" x 4 5/8", the same size of my Whisper White Cardstock. I then used my paper trimmer and cut a 2 3/8" x 3 5/8" rectangle out of the center (this makes a 1/2" border all the way around). This was my mask. I then used Ditto temporary adhesive to hold the mask down. I sponged Orchid Opulence ink onto the Whisper White layer and stamped my leaf image (but I stamped off once because the image was too strong). I them removed the mask and stamped my flower image in Rich Razzleberry ink.
At least, with this technique I didn't have the same problems as dealing with my possessed sewing machine :b So give this technique a try. You can get some really awesome effects.

Supplies
Stamps: Le Jardin Botanique
Paper: Orchid Opulence, Rich Razzleberry, Whisper White
Ink: Orchid Opulence, Rich Razzleberry
Accessories: White Taffeta Ribbon, Scalloped Oval Punch, Large Oval Punch, Stampin' Dimensionals, Snail Adhesive, Sponge Dauber

Wednesday, April 14, 2010

Wheel It Wednesday

This card is almost an exact copy of a card I found on Splitcoast by Mercy Kerin. I fell in love with it and just had to recreate it. Although, there was way more cutting out then I like to do. What can I say, I'm a left handed girl in a right handed world and never did learn how to use a pair of scissors properly. So please don't look too closely :)

ETA: The winner of yesterdays card kit fgenerated on Random.org is number 11. Gail I have sent you an email. Congratulations!!!

Supplies
Stamps: Choo Choo, Right on Track Wheel
Paper: Whisper White for train, Watercolor Paper for background, Taken with Teal, Pumpkin Pie, Sweet Pea DSP
Ink: Basic Gray, Old Olive, Taken with Teal, Pumpkin Pie, Going Gray
Accessories: Pumpkin Pie 1/2" Striped Grosgrain Ribbon, Pewter Jumbo Eyelet, Crop-a-dile, 1/2" Circle Punch, Aqua Painter, Hobby Blade, Stampin' Dimensionals, Snail Adhesive

Tuesday, April 13, 2010

Take It Tuesday

This is a card I made as a swap for my last Stampin' Up! team meeting. You wanna have a fun time, come with me to one of this meetings. We swap cards, make awesome projects, see amazing project samples displayed, watch great demos on new techniques and get recognition for all our accomplishments. Plus, what else could be better than being in a room with 100 other ladies that are as passionate about papercrafting as I am. Ever seen I became a Stampin' Up! demonstrator over 3 years ago, I think I have only missed 1 meeting and that was because we were on a vacation that was booked before the date was set for the meeting.

Today is Take It Tuesday. If you leave a comment on this blog post (click here if you are on Facebook), you will be entered to win a free card kit with enough supplies to make 5 copies of this card (minus the adhesive and stamped images). If you don't have the Inpsired By Nature Stamp Set then just search your stash and stamp with anything you think a butterfly might land on. You have until midnight April 13/10. I will pick a winner on Wednesday.

Supplies
Stamps: Inspired By Nature, All Holidays
Paper: Whisper White, Basic Black, Taken with Teal
Ink: Basic Black Craft Pad
Accessories: Clear Embossing Powder, Powder Pals, Big Shot, Beautiful Wings Embosslit, Tombow Adhesive for butterflies, snail adhesive

Monday, April 12, 2010

Make It Monday

When I started this card, I had in mind to make a fun kids' kind of card but once I was done I felt like it had a more sophisticated look to it. What do you think? I've had an overwhelming feeling to start using supplies that haven't seen the light of days in years. Maybe all the retiring colors kind of put a fire under my butt. So today I picked my Stampin' Pastels. I think they look amazing on vellum like this.

Scroll to the bottom of this post and there is a tutorial on how to recreate this card. Pop me an email if you have any questions.

Supplies
Stamps: All Holidays
Paper: Basic Black, Whisper White, Brilliant Blue, Pink Passion, Green Galore, Vellum Cardstock
Ink: Basic Black
Accessories: Stampin' Pastels, Basic Black 5/8" Grosgrain Ribbon, Filigree Brads, Piercing Tool, Big Shot, Beautiful Wings Embosslit, Tombow Adhesive, Snail Adhesive, Mini Gluedots, Stampin' Dimensionals, Sponge Daubers

Sunday, April 11, 2010

Baby Gift


This is a gift set I made for a friend of mine who had a baby boy. The card is a case from the marvelously talented Wendy Hawkinson and I had to make a matching basket.

Supplies
Stamps: Animals Stories, Teeny Tiny Wishes
Paper: Bashful Blue, Whisper White, Bashful Blue Patterns DSP
Ink: Bashful Blue
Accessories: Bashful Blue Stain Ribbon, Bashful Blue Taffeta Ribbon, Linen Thread to cinch ribbon, Scallop Trim Border Punch, Sherbet Designer Buttons, Perfect Polka Dots Textured Impressions Folder, Big Shot. Stampin' Sponges, Mini Glue Dots

Saturday, April 10, 2010

Clear Mount Stamps Video


Friday, April 9, 2010

Fabulous Friday

I decided to make Friday, Fabulous Friday courtesy of Tyra Banks. I know I'm a geek but I love Tyra. She reminds me of my good friend Maxine, they have the same quirky personally. Maxine and I were roomies for our first 2 years of university, before I moved to a different province. I have a lot of great memories from those years. For instance, we found that after about 3 hours of hardcore studying for finals that we were getting dummyheaded. So, our solution to this was called "Happy Hour" where we would just do and say silly things for a whole hour, like playing Crazy 8's with happy face post-it notes stuck to our foreheads. We would put a sign on our door that said "HAPPY HOUR" and other people in the dorm would actually see the sign and come to visit. Happy Hour was a real hit. One day, there was a very light knock on the door during happy hour. When we opened the door Maxine's Mom was outside with a really weird look on her face. She told us that she saw the sign and was afraid to knock 'cause she thought we were in our room getting drunk. Of coarse this caused a 10 minute giggle fit from us.

Anyway, back to the card. I think on Fabulous Friday I'll post cards with a little extra somethin' somethin'. This is a 5 1/4 x 5 1/4 square card and every layer is sponged with Basic Gray ink, except for the butterflies. I think I got the sketch from the Friday or Saturday Sketch challenge blog. I'll have to double check when I'm not so sleepy.

Supplies
Stamps: Ever After, Great Friend
Paper: Very Vanilla, Basic Gray, Apricot Appeal, Sage Shadow, Nouveau Chic DSP
Ink: Basic Gray Ink Pad, Apricot Appeal Marker, Sage Shadow Marker
Accessories: Basic Gray 5/8" Satin Ribbon, Bog Shot, Beautiful Wings Embosslits Die, Little Leaves Sizzlit Die, Scallop Circle Bigz Die, Circle Scissor Plus, 1 1/4" circle Punch, 1 3/8" Circle Punch. Scallop Circle Punch, Scallop Trim Border Punch, Stampin' Sponges, Stampin' Dimensionals

Thursday, April 8, 2010

Try It Thursday

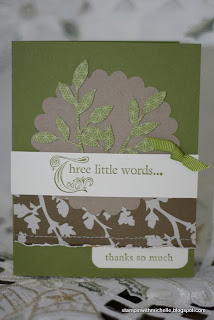
Okay, I am either seriously sewing machine challenged or my sewing machine is possessed. My mother-in-law gave me her old sewing machine a few years back. When she first gave it to me she set it up and it worked fine. She left and went home and the next time I used it, I hadn't changed anything but it wouldn't work right. The tension was off, the thread kept breaking and the machine would just jam up on me. When my MIL came to visit again, she just went zip, zip, zip, rethreaded the machine and it worked fine. She then unthreaded and got me to do it and low and behold it worked fine for me.......then she left......the sewing machine stopped working again. This has been going on for 4 years now. I have 2 theories. The first is that I am a total moron and I can't thread a sewing machine. But the second is much more interesting. I think the spirit of Christine (that possessed car from the Stephen King Novel/Movie) is in my sewing machine. It originally came from my old car. See, my old car was a hand me down 1990 Mustang from my sister, whose name IS Christine. She had her name painted on the driver side door, thus naming the car. From the time I had that car I was in 4 accidents, none of them my fault, 2 of which the other vehicle was written off, and my Mustang never had a mark on it. I, on the other hand, ended up hurt in those accidents. It was like the car was self restoring. It was about 4 years ago I sold the car and the sewing machine shows up. It is like the silly thing will only work for it's original owner and it tried to take my eye out with a broken needle....LOL
Anyway long story short, it took me all after and about 6 pieces of cardstock (not counting all the practice tries on printer paper) to sew a straight line this card.

After this rant my Try It Thursday is sewing on cards. For those of you who don't have sewing machine issue you can zip your paper right through your sewing machine. But if you are like me...next time I will be using my mat pack and piercer to poke holes and then needle and thread to run a stitch through the holes. But give it a try, the result is beautiful.

This card is a case from page 33 of the Idea book and Catalogue. It was originally a Christmas card but given the time of year I decided to change it to a Thank you card. I didn't have the wood sheets or the DSP used in sample so I changed it to Kraft cardstock and Autumn Traditions DSP.

Supplies
Stamps: Three Little Words
Paper: Whisper White, Old Olive, Kraft, Autumn Traditions DSP to sew on,
Cottage Wall DSP for flowers

Ink: Old Olive
Accessories: Old Olive 1/4" grosgrain ribbon, Big Shot, Scallop Circle Bigz Die,
Little Leaves Sizzlit Die, Stampin' Dimensionals

Wednesday, April 7, 2010

Wheel It Wednesday


I have decided to start using my woefully neglected Stampin' Around Wheels at least once a week. The wheels are one of the big reasons I fell in love with Stampin' Up! but I seem to rarely use them anymore. My vow is to leave no wheel unused.

ETA: I was not specific on where to comment on my email I sent out and I received comments on both my blog and my facebook group, lesson learned for next time. So what I did was to number the comments by time received. I went to random.org and from 1 to 13 it selected ................(drum roll please).......#8. So Nadine Samuel, I will be contacting you regarding your free card kit. Congratulations!!!!

Supplies
Stamps: Vintage Vogue, Very Vintage Jumbo Wheel
Paper: Rich Razzleberry, Whisper White
Ink: Rich Razzleberry Ink Pad, Old Olive Ink Pad
Accessories: Rich Razzleberry Polka-dot ribbon, White Halfback Pearl from Pretties Kit, Eyelet Border Punch, Corner Rounder Punch, Stampin' Sponges

Tuesday, April 6, 2010

Take It Tuesday


Be sure to leave a comment at the bottom of this post for a chance to win a card kit with enough supplies (minus adhesive) to make 5 of the cards pictured in yesterdays post. One lucky winner will be picked by a random draw. You have until midnight on April 6, 2010 to enter and I will pick a winner on Wednesday April 7. Good Luck everyone!!!

Today's card also uses the "A Flower For All Seasons" stamp set only this card is stepped up a notch. I love the new Sweat Pea collection. It just shouts spring to me. I hope you have a great day and thanks for stopping by.

Supplies
Stamps: A Flower For All Seasons, Friends 24-7
Paper: Whisper White, Chocolate Chip, Sweat Pea DSP
Ink: Basic Brown (for stamping), So Saffron for sponging Whisper white and DSP
Accessories: Watercolor Pencils for coloring, 1/2" Library Clips, Chocolate Chip 1" double stitched ribbon, Sweat Pea Stitched Felt Flowers, Small Oval Punch, Large Oval Punch, Scallop Oval Punch

Monday, April 5, 2010

Make It Monday


This is a classic layout that works with almost any stamp set. I love the "A Flower For All Seasons" stamp set because you can use it all year round for all different occasions. Just change the paper color and you are good to go.

I have attached a PDF with step by step instructions on how to complete this card. Leave me a comment if you are having any problems.

Be sure to stop by tomorrow. If you leave a comment you will be entered to win a card kit with enough supplies to make 5 of these cards.

Supplies
Stamps: A Flower For All Seasons, Thank You Kindly
Paper: Rich Razzleberry, Pale Plum, Whisper White, Cottage Wall DSP
Ink: Rich Razzleberry ink Pad, Markers- Old Olive, Rich Razzleberry, Pale Plum,
Going Gray, Sahara Sand
Accessories: Rich Razzleberry Polka-Dot Ribbon, Stampin' Sponges, Snail Adhesive
A Flower for All Seasons

Friday, April 2, 2010

Watercolor Wonder Crayons

Here is a great video from Stampin' Up! on using the Watercolor Wonder Crayons.

http://www.youtube.com/watch?v=OqU-3kOMrzU

Newer Posts Older Posts Home